- Software Working Process
- User Interface
Software Working Process
1: Install and Run the Tool.
Launch the Google Workspace Backup Software as an administrator on your OS.

2: Select Backup Options
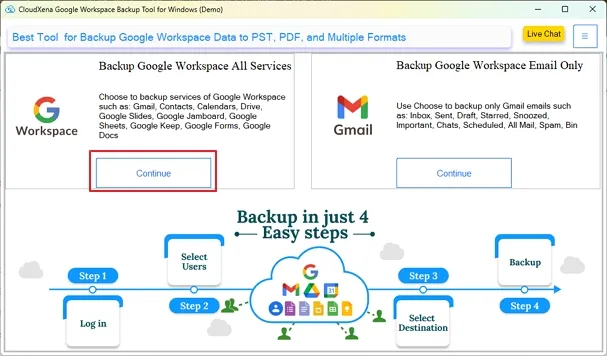
The software Wizard will present you with two options:
- Backup Google Workspace All Services: Choose it to backup all the Google Workspace data items to different File Formats or Email Clients.
- Backup Google Workspace Email Only: This option allows the user to backup the emails only to different File formats or Email Clients.
Here, we choose Backup Google Workspace All Services. Pick your desired option and click Continue.

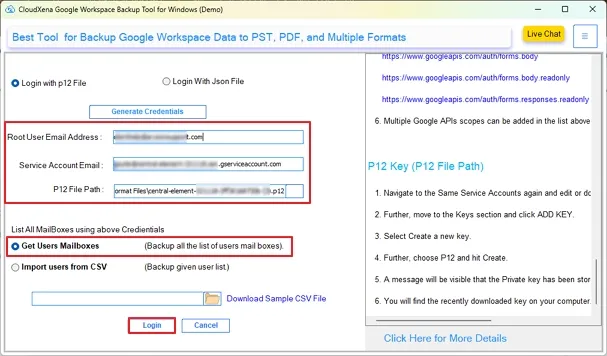
3: Log in Options
Now, choose to Login with p12 file or Login with JSON File and click the Generate Credentials button to get Service account key and p12, JSON files.
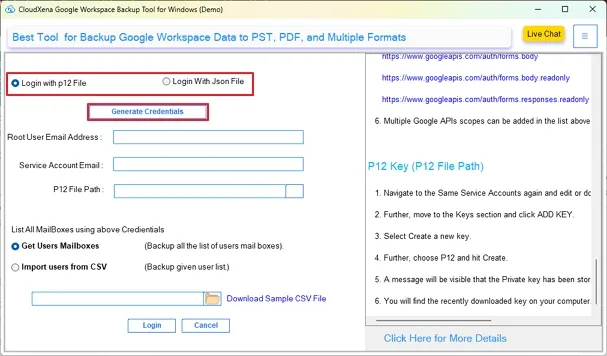
Note: Refer to this key creation guide to find out how to create p12 and a JSON file.
4:Login Google Workspace Account
After generating credentials, enter your Root User Email Address, Service Account Email, and File Path. Then, click Get User Mailboxes and tap Login to sign in to the account.

Note: For Login via JSON, you do not need the Service Account Email Address.
5: Log in to Multiple Accounts
To access multiple IDs, select the option Import Users from CSV and browse the CSV file path in your system. Click Login.
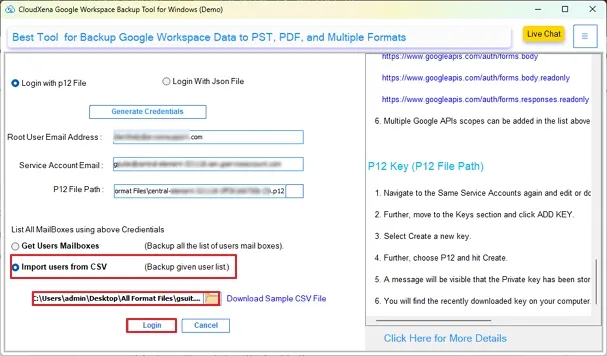
Note: Ensure that no field is empty when you choose this option.
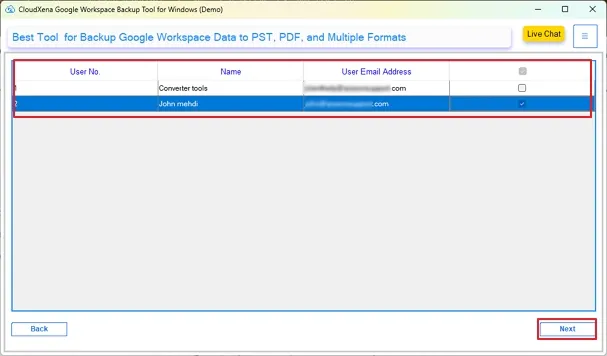
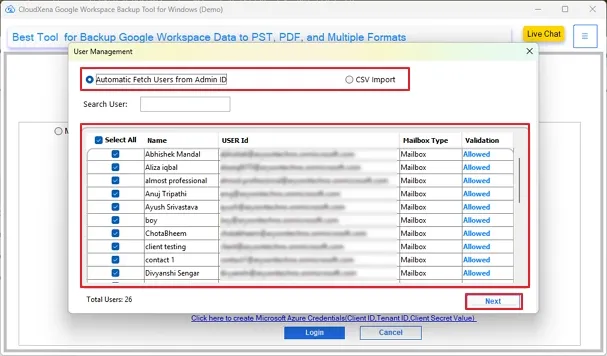
6: Select User IDs
After successful Authentication, select the ID/s from which you want to export the data items. Then click on the Next button.

7: Select Google Workspace Services
Opt for the Google Workspace Items to backup to the Email Client or File Formats. Then click the Next button to continue.

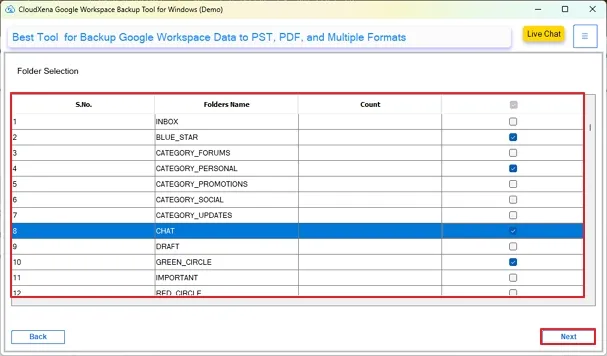
8: Select Account ID Folders (Optional)
If you have chosen only a single Workspace account ID and selected Gmail as well for the backup, then you get the option to preview folders within it and select them for selective backup. Note that this option is not available with multiple accounts or without Gmail selection. Tap Next.

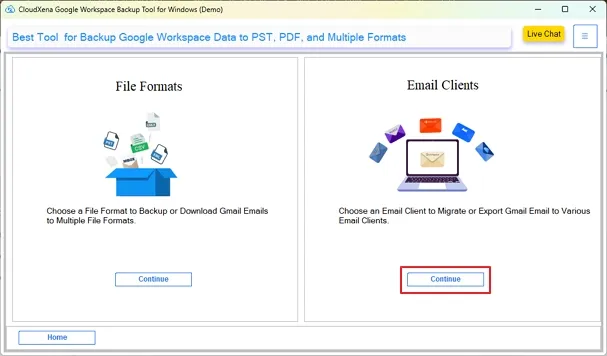
9: Select Saving Option
The tool offers options to choose either File Format or Email Client. Pick one as per your need. Here, we select file formats for PST. Tap Continue.
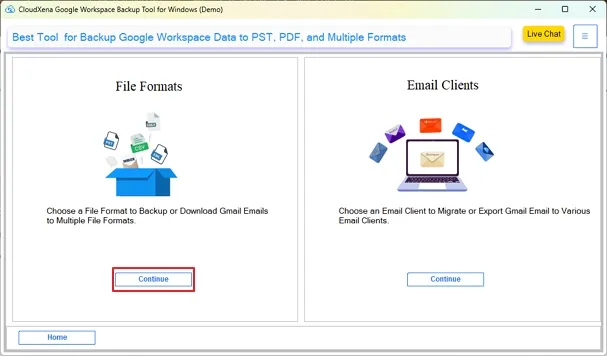
Note: This option to select for file format and email client is only available if you have opted for Gmail only or Gmail along with other Google Workspace services.
10: Choose Output Format
Now, pick PST from the drop-down list of file formats for the Google Workspace local backup.
These views help you understand file distribution and storage consumption.

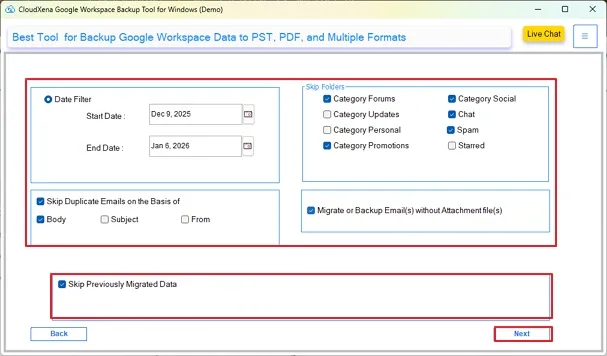
11: Apply Filters
Further, the tool offers different features and filters. Choose among the following as per your need:
- Date Filter: Choose a start and end date to back up selective data items in that time period.
- Skip Folders: Use this option to skip folders that you do not want to backup. Check the boxes that you want to skip.
- Skip Duplicate Emails on the Basis of: Utilize this filter to remove duplicate File items based on Body, Subject, and From.
- Save Attachments Separately: To store the attachments with the emails at a different location on the system.
- Split Resultant PST: This feature can split large PST files into smaller PST files by MB or GB.
- Migrate or Backup Email(s) without Attachments: This option excludes attachment files while backing up the G Suite Emails.
- Skip Previously Migrated Data: Opt for this choice to exclude previously transferred Google Workspace data items.
- Naming Convention: Use it to set a custom name for your resultant file for easy access based on Date, Subject, and From parameters.
Click Next after the filter selection.
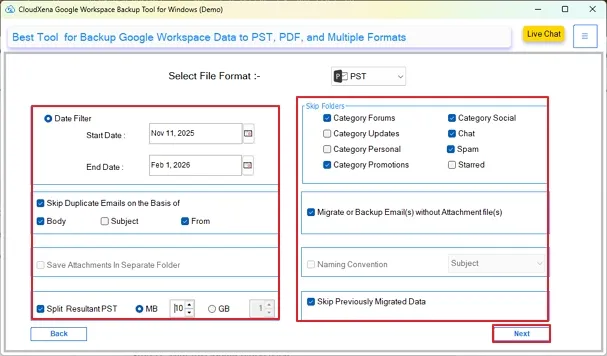
Note: Different filters are available for different file formats. You may not find all the filters available for all formats.
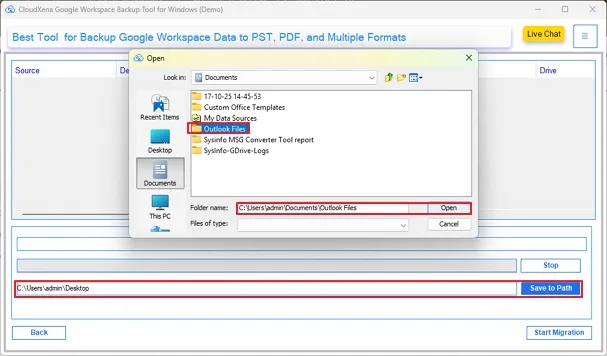
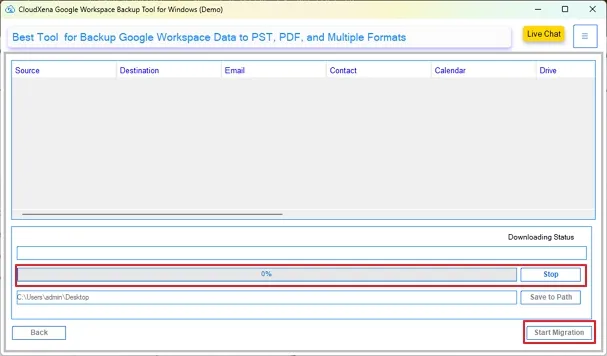
12: Select Destination
Click the Save to Path button to specify the destination for your resultant file.
Note: This option is directly available after the Google Workspace service selection if you do not opt for Gmail.
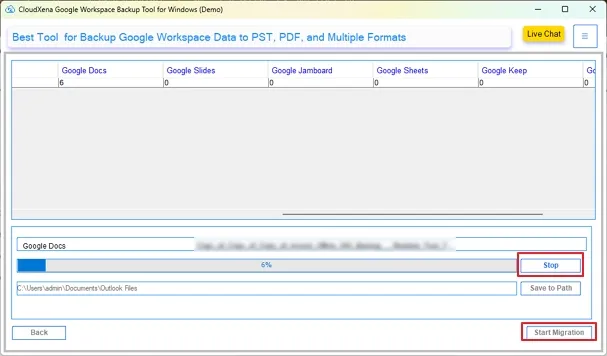
13: Migrate Google Workspace Data
Click the Start Migration button to initiate the backup process of Google Workspace to PST. Press the Stop button to halt the process in between if required.
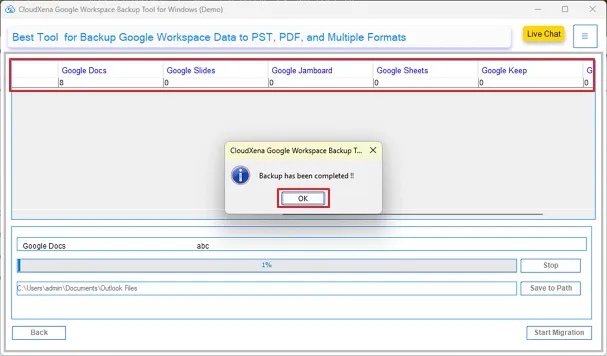
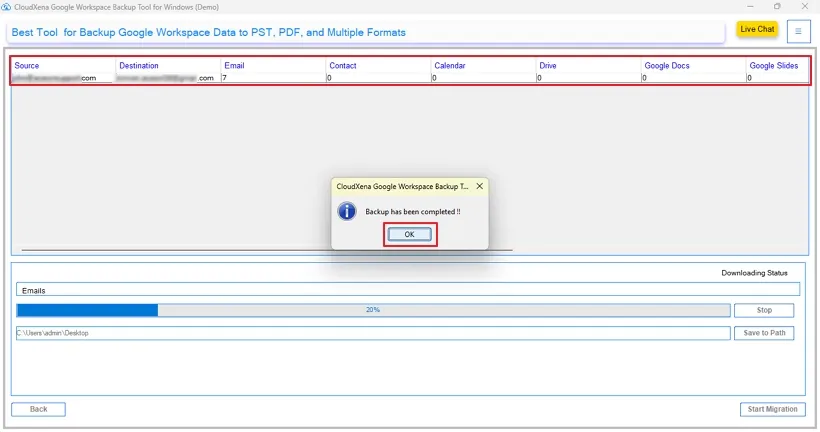
14: Check Migration Status
After successful migration, click the OK button to close the window. You can check the result of the migration.
1: Install and Run the Tool.
Launch the Google Workspace Backup Software as an administrator on your OS.

2: Select Backup Options
The software Wizard will present you with two options:
- Backup Google Workspace All Services: Choose it to backup all the Google Workspace data items to different File Formats or Email Clients.
- Backup Google Workspace Email Only: This option allows the user to backup the emails only to different File formats or Email Clients.
Here, we choose Backup Google Workspace All Services. Pick your desired option and click Continue.
3: Log in Options
Now, choose to Login with p12 file or Login with JSON File and click the Generate Credentials button to get Service account key and p12, JSON files.

Note: Refer to this key creation guide to find out how to create p12 and a JSON file.
4:Login Google Workspace Account
After generating credentials, enter your Root User Email Address, Service Account Email, and File Path. Then, click Get User Mailboxes and tap Login to sign in to the account.
Note: For Login via JSON, you do not need the Service Account Email Address.
5: Log in to Multiple Accounts
To access multiple IDs, select the option Import Users from CSV and browse the CSV file path in your system. Click Login.

Note: Ensure that no field is empty when you choose this option.
6: Select User IDs
After successful Authentication, select the ID/s from which you want to export the data items. Then click on the Next button.
7: Select Google Workspace Services
Opt for the Google Workspace Items to backup to the Email Client or File Formats. Then click the Next button to continue.

8: Select Account ID Folders (Optional)
If you have chosen only a single Workspace account ID and selected Gmail as well for the backup, then you get the option to preview folders within it and select them for selective backup. Note that this option is not available with multiple accounts or without Gmail selection. Tap Next.
9: Select Output Option.
The tool offers you the option of File Format and Email Client for backup. Select one as required. Here, we will choose an email client for conversion. Click Continue.
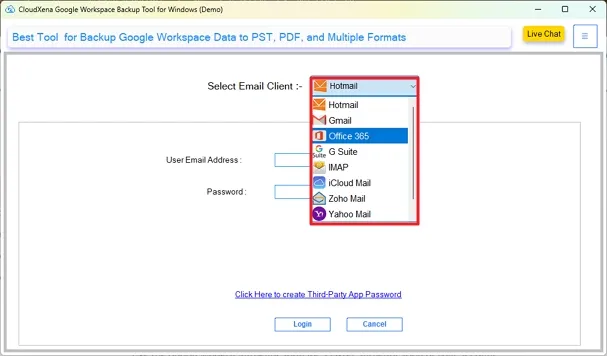
10: Select Target Platform
Now, expand the list of email clients and select Office 365 from the drop-down list of email clients.
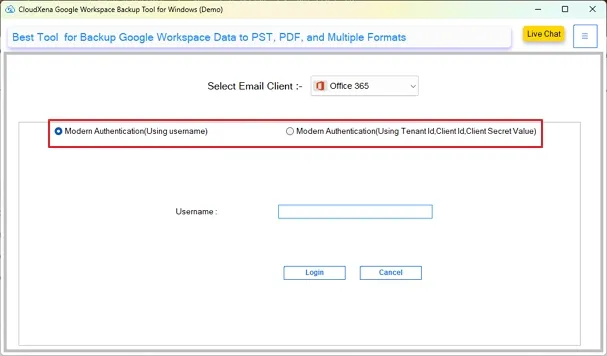
11: Select Authentication Mode
Use the Modern Authentication option for faster authentication of your account. Or you can opt for Modern Authentication using Client and Secret ID.
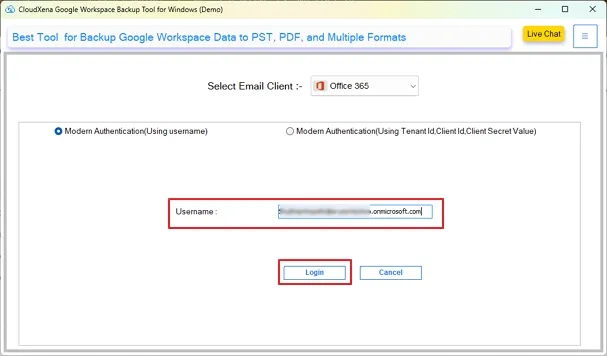
12:Modern Auth Sign In to Office 365
Enter your username and click Login to complete the sign-in and authentication directly through the browser.
13: Authentication Complete
Once you complete the browser sign-in, a message is displayed as authentication complete. Close the window and go back to the tool for further processing.

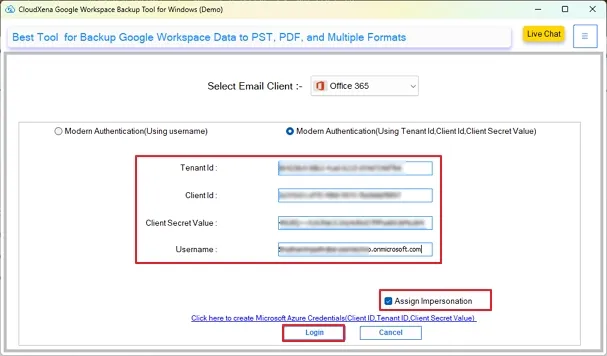
14: Client ID Login to Office 365 (Alternate Login)
Enter your Office 365 Client ID, Tenant ID, Secret Value, and Username. Select the option Assign Impersonation to access multiple Office 365 IDs and click Login.
15: Assign Impersonation ID Selection
If you select the option Assign Impersonation, then you have to choose the Office 365 user IDs to which you need the data. There are two modes for it:
- Automatic Fetch Users from Admin ID: The software fetches all the user IDs associated with your Office 365 account. You can select the particular IDs of your choices.
- Import CSV: Add the CSV files from your system with all the User ID details. Then, click the Next button to proceed further.
Note: This option only arrives for transfer to multiple accounts when you have opted for Assign Impersonation and login via Client ID. It is not available with Modern authentication as it is only for a single user account.
16: Apply Additional Features
Further, the tool offers various features. Choose among the following as required:
- Skip Folders: Use this option to skip folders that you do not want to back up. Check the boxes that you want to skip.
- Skip Duplicate Emails on the Basis of: Utilize this filter to remove duplicate File items based on Body, Subject, and From.
- Skip Previously Migrated Data: Opt for this choice to exclude previously transferred Google Workspace data items.
- Migrate or Backup Email(s) without Attachment file(s): This option excludes attachment files while backing up the GSuite Emails.
- Date Filter: Choose a start and end date to back up selective data items in that time period.
Click Next.
17: Migrate Google Workspace
Click the Start Migration button to initiate the backup process of Google Workspace to Office 365. Press stop to halt the process in between as needed.
18: Migration Status
After successful migration, click the OK button to close the window. You can check the result of the migration.
Installation & Uninstallation
Download the step-by-step installation or uninstallation PDF guides below:
Windows Installation Windows UninstallationUser Interface
Once you launch the CloudXena Google Workspace Backup Tool for Windows, you will see the following interface.